Posted on Apr 23rd, 2020
Today’s topics
- CSS layout with flexbox
- Responsive web design, media queries, and breakpoints
- Basic web design principles
Project
Build a professional portfolio site
Link to the assignment invitation
Links and resources
Code, slides, and video from class
Posted on Apr 22nd, 2020
Today’s topics
- Styling HTML with CSS
- CSS syntax: selectors, properties, values; shorthand properties
- Working with color, text and font properties, and backgrounds
- The box model, margin, and padding
- Units of measurement
Project
Build a Dog Adoption website
Link to the assignment invitation
Links and resources
Code, slides, and video from class
Posted on Apr 21st, 2020
Today’s topics
- Learn about HTML tags and elements
- Create a page with HTML
Intro to GitHub Classroom
We are using a tool called GitHub classroom to generate a repository (repo) on GitHub for each student to work in.
Each day we will share an assignment invitation here on this page. Clicking on the link will take you to a page where you will see as message that looks something like this:
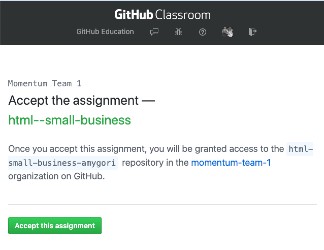
You’ll see your github username as part of the repo name instead of amygori. When you accept the assignment, GitHub will create your homework repo and, when it is done, give you a link to it (from now on, this is the link you will use to see your project on GitHub, NOT the assignment invitation link). Go to that newly created repo and click on the green button to “Clone or download” your repo. This will copy the repo’s url to your clipboard.
In your terminal, navigate to the folder where you intend to keep your projects. When you are in the directory you want to be in, type git clone <url-for-your-repo>, but in place of , paste in the url you copied from GitHub. You'll see output indicating the repo is being cloned. When it's done, you can `cd` into it and type `git status` to see that you are in a git repo. Open this repo in VS Code (an easy way to do this is to type `code .` when you are in the assignment repo) and do your work here. Add and commit in the terminal as you work.
Using VS Code
VS Code (or Visual Studio Code) is a text editor made by Microsoft. It is free and open source, and it’s used by many professional developers these days.
If you haven’t installed it yet, see the Setting Up Your Computer instructions for how to do that.
See Getting Started with VS Code for an overview and a video intro to using this tool.
Project
Build a Small Business Website
Link to the assignment invitation
Links from class
Posted on Apr 20th, 2020
Today’s topics
- Orientation
- Developer tools
- Setting up your computer
- Using the command line
- Git & GitHub
Project
Install Git-It, a tutorial program that will walk you through the basics of Git and GitHub.
To install it, run:
brew cask install git-it
This should put the Git-it program in your /Applications folder.
Git-it will tell you to install Github Desktop. You do not have to install this, although you can if you want. We won’t be using it in class.
When you try and run Git-it, you may get a notice that the application is from an unknown developer. If so, right-click on the application and then choose “Open.” You will be presented with a dialog – choose to run the application.
Once running, complete the tasks in Git-it. Completion of the assignment is the link to your pull request you will make in the second-to-last Git-It task.
Submit that url using this form.
TODO
- Read the student guidelines and how we work remotely docs in their entirety.
- Make sure your computer is all set up and ready to go.
- Read the Really Friendly Command Line intro.
- Read the Really Friendly Git intro.
Links from class